Category: Windows Server

  • How to auto-log off specific users from a Terminal server when the user no longer is connected via Remote Desktop Session

    In this example I am looking at scenario where some particular users in your organisation need to be automatically logged of from a specific computer (in this case it is a Terminal Server) after some time, after the user has closed the connection to the Terminal Server but did not log off from the server.

    In real life this will be a very frequent scenario, because the user simply closes the remote desktop session with “x” on the bar of the remote desktop window. I do it even myself , because the “log off” button is somewhat hidden.

    You might be writing those beautiful email to your users, explaining the correct process for closing the RDS, but you are most likely to loose this battle because there will always be someone who doesn’t obey. That’s life, ….. get used to it 🙂

    But why would we want to force a log off from a Terminal Server? Well, its all about the precious resources. If you have one or two users, they will not have much of negative influence on the server performance, but if u have 100 users, …. then things change dramatically.

    In this tutorial I will quickly look at one of few ways that this can be achived. We will be using a special GPO function called “Loop Back”

    We will cover following steps:

    1. Creating a group of users who are not to be logged off automatically
    2. Creating an OU (Organisational Unit) to hold our Terminal Server
    3. Creating a GPO to automatically log off users

    1. Creating a group of users who are not to be logged off automatically

    Go into Server Manager and start the Active Directory Users and Computer Console. Please note that all will be done on the Active Directory Server and not on the Terminal Server directly.

    From there navigate to the OU where you store your groups. Create a new local group. In my case it will be

    \FunctionGroups\RDS_Auto_LogOff_Exceptions

    Now assign the users who are not to be affected by the auto logoff function by simply adding those users to the group.

    2. Create an OU to hold the Terminal Server

    Open the Group Policy editor via Server Manager. Right-Click on your domain tree and from the menu add a new Organisational Unit. Let us call it TerminalServer. Now drag the Terminal Server Computer into that newly created OU. Most likely the Terminal Server is found inside the “Computers” OU. Be advised though that if u had any other GPOs strictly connected the Computers OU and the Terminal Server should be affected by this GPO, make sure to relink this GPO to the newly created OU “TerminalServer”

    3. Create a GPO to automatically log off users

    As a next step we are going to create a GPO which will log of the users after x time of being disconnected form the Terminal Session.

    Create a new GPO, name it for example “AutoLogOff Disconnected Users from TerminalServer

    Best Practice: Makes sure to always use descriptive names for the GPOs. At the end of the day you must be able to know what the GPO is all about.

    Let us modify the GPO and go into following settings:

    UserConfiguration>Policies>AdministrativeTemplets>WindowsComponents>RemoteDesktopServices>RemoteDesktopSessionHost>SessionTimeLimit

    We are going to modify two entries. (Unfortunatelly the screenshot below is in German but you will certainly find it in english too 😉

    We are going to activate both settings:

    1. Set time limit for disconnected session

    2. Set time limit for Log off for RemoteApp Sessions

    Let us choose a time limit. I set it to 30 min. You can set it to anything you like.

    In general it would be enough to just setup one of the settings. The first one is more general with a brighter spectrum, independent of remote apps. For the purpose of this tutorial I will leave both activated.

    As the next step we will have to active a Loop Back settings for this particular GPO.

    Let us navigate, within the same GPO edit, to:

    ComputerConfiguration>Policies>AdministrativeTemplates>System>GroupPolicies

    Activate the setting.

    Now we go back to GPO list and on the right side in the properties of the GPO make sure that Authenticated Users is set in the Security Filterring option as shown below.

    As next step, we need to go into the delegation tab of the GPO. When being there click on the advanced options and add the previously added Group “RDS_Auto_LogOff_Exceptions”

    When being inside the advanced security opotions we need to do the following

    1. Set Attributes to Authenticated User to Allow for Read and Policy Apply

    2. Set Attributes to RDS_Auto_LogOff_Exceptions to Deny for Read and Policy Apply.

    Once this has been done we are going to link the newly completed policy to the TerminalServer OU.

    As the last step we must force “GPupdate” command on both the DC Server and Terminal Server.

    > gpupdate /force

    After completion make sure that all users on the terminal server are logged off. If not the case, go to the terminal server and force-log-off each user. This can be done via Task Manager in the User Tab.

    This is it. Now each user who only disconnects from the terminal server will be from now on also logged of automatically. Any exceptions can be added to the Exceptions Group “RDS_Auto_LogOff_Exceptions” and these users will not be affected by the auto log off.

  • How to get a remote computer software listing in Windows environment using WMI

    If you are looking for a way to get a list of installed program on a remote pc follow these steps

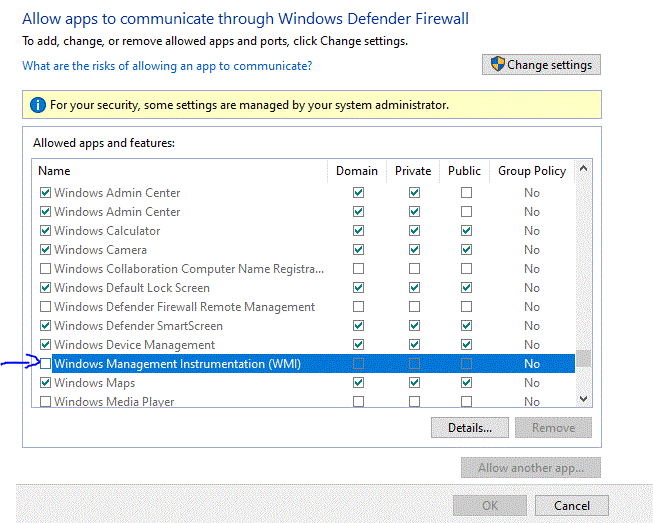
    1. You will need to make sure the firewall rules on the remote pc are set to allow.
    Allow WMI through Firewall in Windows  locally

    If you are an IT Admin you can deploy a rule through the GPO to all your desired clients without the need of accessing them manually.

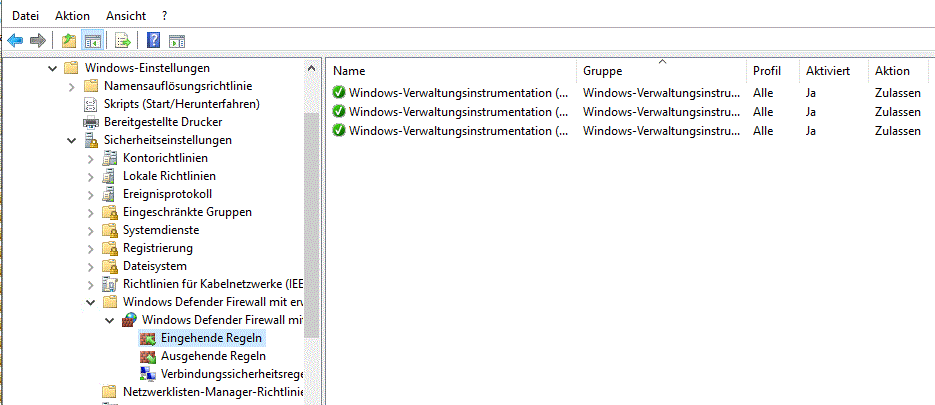
    Just go to Computer Settings>Windows Settings>Security settings>Windows Defender with extended settings>Incoming Rules. Then choose a predefined rule and find the WMI section and set it to allow. It will directly mark three necessary components.

    2. You will need to run CMD as Admin and start the wmic program. Once done follow the syntax

    > wmic
    > /node: "COMPUTERNAME" /output:C:\listofprograms.txt pruduct get name,version,vendor

    Make sure to replace the “COMPUTERNAME” with the right remote computer name or just use the IP address (but without the quotes). The output list name can be anything really.

    You can also view the installed software direct in the console by just omitting the output command

    >/node: "COMPUTERNAME" pruduct get name,version,vendor

    This one on the contrary provides a full list which will be formatted as csv and comma-separated

    >/node: "COMTUTERNAME" /append:"C:\programlist.txt" product list full /format:csv

  • How to sync Server Clock with the Internet

    The purpose of this short tutorial is to set the server internal clock, which will be synchronised with the internet rather than the local BIOS clock. A Bios clock can get inaccurate over time and this would be something we do not want to happen.

    To do so, start the CMD as Admin and type the following:

    w32tm /config /syncfromflags:manual /manualpeerlist:"pool.ntp.org" /reliable:YES /update 

    This inputs the config entry into the registry.

    In order to sync the time with the internet:

    w32tm /config /update 
    w32tm /resync

    These commands refresh the configuration and resync the time with the server

    Once the clients in your network relog their time will get resynchronised with the server.

  • How to set up to a Terminal Server with Remote Desktop on Windows Server

    Lets presume you have an application that should be accessed by multiple users. You do not want to have the application be installed on multiple clients but rather be on a central host which will be accessed by all users. The benefit of such set up is that you have one application to be deployed and managed rather then multiple separate installations.

    In our case study we are having two separate servers.

    One is our Terminal Server where we want all the clients to connect to via Remote desktop. The other one is our Active Directory Server where all users are managed and authenticated.

    Following steps are required in order to achieve our task:

    1. Adding Windows Roles and Features to Terminal Server
    2. Adding Group Policies (GPO) to Terminal Server
    3. Installing License for Remote Desktop on our Terminal Server
    4. Linking Licensing Server to Active Directory Server

    Adding Windows Roles and Features to Terminal Server

    Firstly, you must add the following roles:

    1. Remote Desktop Licensing
    2. Remote Desktop Session Host

    see the screenshot below. Although in German you should be able to get the idea.

    After having installed the two roles let us move to the next point.

    Adding GPO to terminal server

    Now let us start the GPO editor. Just type in the search bar

    gpedit.msc

    Navigate to:

    Computer Configuration > Administrative Templates > Windows Components > Remote Desktop Services > Remote Desktop Session Host > Connections

    Here again a screenshot in German but you should be able to find it 🙂

    Now edit the highlighted 3 options.

    1. Automatic Reconnection
    2. Limit number of connections
    3. Restrict Remote Services Users to a single Remote Desktop Session

    We want to have the first option activated. It will make sure you get reconnected after for example short internet disconnection.

    The second option set as desired depending on the number of users authorized to use RDS

    Third option make sure to deactivate.

    At this stage we are ready to install the RDS license.

    Installing License for Remote Desktop on Terminal Server

    At this stage it is important to install the CAL License. You can actually use RDS without a valid license, but this is allowed only for a limited time and any per son logging into a Terminal Server will be informed that not license is not present. Additional you will be receiving a ballon message saying:

    Remote Desktop licensing mode is not configured. Remote Desktop Service will stop in 10 days. On the RD Connection Broker server, use Server Manager to specify the Remote Desktop licensing mode and the license server.

    Let’s open the Remote Desktop Licence Manager. You can find it by searching the name in the Start Menu.

    Now we will click on the name of our Server with the right mouse button and choose Install License. This will open a Wizzard which will guide you through the process. Makes sure you have got a valid license.

    Once you have added a valid license, it will validate and allocate it. I for example use a license for 50 users. (In this case I use a license per user)

    So now we are almost done but still one point needs to be adjusted. Because in this tutorial we a using active directory, we must tell our AD Sever that there is an valid license for the Remote Desktop Sessions. For this reason we will point Active Directory to the RD Licensing Server (which in our case is found on our Terminal Server)

    Linking Licensing Server to our Active Directory Server

    1. This procedure will be done using the Group Policy.
    2. Lets add a new organizational unit to our Active Directory and name it e.g. TerminalServer.
    3. Having done so let us move the Terminal Server Computer inside this newly created OU.
    4. Now open the Policy Editor. Let us create a new policy and call it “Licensing_RDP”
    5. Now edit the newly created policy and navigate to:

    Computer > Navigation > Policy > Administrative Templates > Windows Components > Remote Desktop Services > Remote Desktop Session Host > Licensing

    You will want to activate and set the Set the Remote Desktop licensing mode option. I have chosen the option “per user” as this corresponds to my license type

    Now we must point where our Remote Desktop Licensing Server is found. For this active and edit Use the specified Remote Desktop license servers. Inside the option just add the server IP address.

    Now we are done done with the configuration. Run gpupdate /force on both servers and test your RDS connections

    Useful Trouble Shooting

    Should you get difficulties with the RDS Profiles at some point it is crucial to check the the C:\Users Folder for any TEMP Folders. If these get created check out the SID of the USERS and look for the settings in the Registry editor:

    Computer\HKEY_LOCAL_MACHINE\SOFTWARE\Microsoft\Windows NT\CurrentVersion\ProfileList\

    In order to list the SID of the users use the following command in CMD

    wmic useraccount get name, sid

    or using PowerShell 7

    Get-ADUser -Identity ‘username’ | select Name, SID

  • Installing SSH on Linux Ubuntu 20.04

    SSH known as Secure Shell is a protocol for operating network services securely. It is needed especially if you are for example planning on managing your Linux Server from Windows.

    Installation:

    SSH protocol can be installed automatically during ubuntu fresh installation. An option is being displayed which merely needs to be marked with an ‘x’ for an automated installation.

    Lets presume this was not the case and you need to install this afterwords. The procedure is very simple.

    • Update all linux libraries first:

    $ sudo apt-get update

    • Upgrade linux installation if necessary

    $ sudo apt-get upgrade

    • Install SSH

    $ sudo apt install ssh

    Please confirm and allow creation of an ssh key.

    How to connect to ssh Linux from Windows?

    On your windows machine do the following:

    1. Start CMD as Administrator
    2. Start Power Shell

    C:\WINDOWS\system32> powershell

    3. SSH your linux server:

    PS C:\WINDOWS\system32> ssh linuxusername@192.168.100.10

    Replace ‘linuxusername’ with the your linux username and replace ‘192.168.100.10’ with the IP address of your linux installation.

    After doing so you will be prompted to enter the password of the linux username and you will be asked to accept the ssh key. After accepting it the key will be saved on windows machine as a trusted ssh keys.

    Your are now logged into linux from a windows Command Prompt.

    You might also consider setting up the appropriate firewall rules on your linux server especially opening the port 22 to gain access. You can follow this post to learn how to use, configure the ufw firewall

  • How to copy files from Linux to Windows using PSCP

    If you are looking for a way to copy files directly from Linux to windows I strongly recommend using a “pscp” command. This command which is by default part of Linux but in Windows environment it requires the necessary libraries. These can be downloaded here.

    Upon downloading please place the file inside this path: C:Windows\System32.

    You can test if the new command works by:

    1. Starting CMD as Administrator
    2. Starting PowerShell by typing ‘Powershell’
    3. Type: pscp

    You should receive a similar return:

    Now you can start copying files from Linux to Windows using the following syntax

    C:\>pscp user@192.168.100.5:/Home/<yourusername>examplefile.txt C:\temp

    After pressing enter you will be prompted to accept ssh certificate (make sure that ssh is enabled on your Linux installation, if not follow this link) and you will be asked to enter the ‘sudo’ linux user password.

    After doing this the desired file will be copied over port 22 into C:\temp. Here, instead of C:\temp, you are allowed to type any path to a desired folder on windows installation.

    How to copy Files from Windows to Linux?

    In order to achieve this just reverse the syntax. Using the example above type the following:

    C:\> pscp c:\temp\examplefile.txt user@192.168.100.5:/home/<yourusername>examplefile.txt

    SSH over Internet

    If you are intending to ssh your linux installation from the internet, make sure to forward port 22 to your Linux IP address.

    Although this means of managing your server is possible. I do not recommend it due to security reasons. Firstly it open your server vulnerable to port scans, secondly the ssh ist not secure enough enough to sleep tightly in my opinion.

    As alternative means I strongly suggest to use SSH over VPN (Virtual Private Network). Since you already have a Linux Server, it should not pose too much difficulties on setting up your own VPN Server, which will allow you to enter your own local network from all over the word 🙂

    Please follow this link to learn how to install and configure a private VPN Server based on OpenVPN.

  • Windows Server Must-Know Commands

    Here is list of some useful commands that can be typed directly in Command Prompt

    \> Powershell

    Elevates Command Prompt console to powershell

    \> Invoke-GPUpdate -Computer COMPUTER02 -RandomDelayInMinutes 0

    Forces group policy update on a desired computer in local network. Change 0 to a desired number of minutes. This will specify the delay until the command will be executed.

     \> netstat -sp tcp

    Displays all established tcp connections with its port number and ip address

    \> ipconfig /all

    Displays full IP Configuration

    \> sfc /scannow

    In Powershell scanns and repairs corrupted system files

    \> Dism /Online /Cleanup-Image /RestoreHealth

    In Powershell scanns and repairs corrupted system files